Lighting 101: Snoots, Gobos and Grids
Abstract: If you want to make something more interesting, don't light all of it.

Now that you are getting comfortable with the idea of shooting a light into an umbrella or ceiling, creating the lighting ratio and being color correct, it's time to start stretching a little.
Sometimes what makes a photo sing is not so much where the light is, but where it isn't. And, given that you already have a basic, off-camera strobe setup, you can make the gear you will need to restrict light for just a few pennies.
Remember when we talked about putting the Velcro on the sides of your flash head? It holds gels fine, but you can also use it to attach lighting mods to your flash. (You don't have to permanently attach Velcro to your flash, either. There are removable Velcro "grippers" for mounting things.)
One of my favorites is called a "gobo." Gobo is short for "goes between optics," as in something that goes between the light and your lens. Some people also call them cutters, or flags. Whatever you call them, they are there to partially block light.
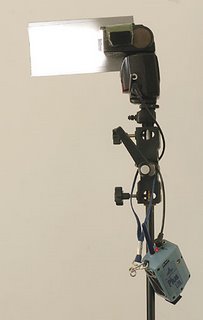 To make a useful-sized GoBo, Cut a piece of still cardboard to make a rectangle about 4x8 inches. Stick some Velcro (the "hooks" side) at one end and at about a third of the way from the other end. This will allow you to attach it to the side of your flash either way so that you can choose how far it sticks out.
I also cover mine with a layer of gaffer's tape. This is the cloth-backed tape that is widely used in the photo industry. It holds great and does not leave any residue. It is not duct tape. Not even close. They are not interchangeable.
Now, you have a sort of "barn door" (really, that's what it's called) that can block the light from your flash in the direction that you choose.
Say you are using your flash to side/backlight something. Your flash, being small and not-too-powerful, is just out of the camera frame. The Gobo could be stuck on the side of the strobe closest to you to keep light from flaring into your lens.
You can also use one on each side of the flash to make light that spreads vertically, but not horizontally (or vice versa.) You can keep light off of a background this way, as you may be lighting it from another source.
You can make them out of cardboard or you are into the DIY look. They just slide into the lid or back pocket of a Domke bag and weigh almost nothing. No brainer.
 If you want to restrict the light even more, you'll want a snoot. It is nothing more than a sort of tunnel for the light to go through that will restrict it is all directions except for the exact direction the strobe is pointed.
Just shape the cardboard into a rectangular-shaped tube that will slide over your flash head. Make a few - 6", 8", 12" - the longer the tube, the tighter the beam of light. Now cover it in gaffer's tape to make it more durable and light-tight.
(By the way, when you shoot with a snoot, set your flash on its most telephoto setting. No sense in wasting power by sending a wide beam of light just to block it with the snoot.)
How much do snoots restrict the light? Let's do a test:

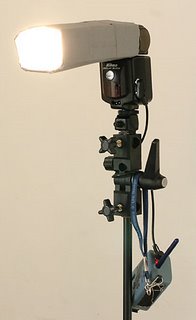
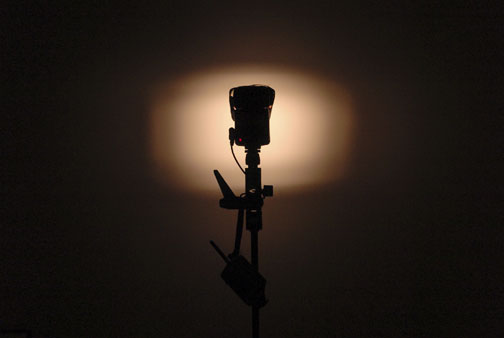
This is a flash fired against the wall (4 feet away) at the "85mm" zoom setting. Note the pattern of the light.
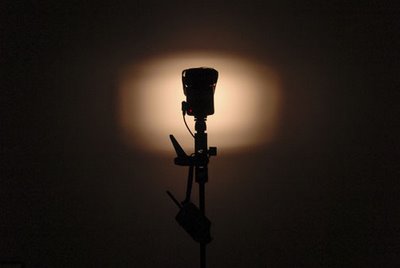
This is the same setup, with an 5" snoot on the flash.
When doing a portrait, the aim of the snooted flash is obviously a bit critical. How can you tell where the beam will hit without a modeling lamp on your flash?
Easy. You ask your subject, "Can you see the front of my flash through the tube from where you are sitting?" If they can, the light will be falling on their face. Do a test and tweak it as necessary using the back of your camera's display as a guide.
__________
In the frame at the top of this page, I used a snoot to light the face of the CEO of Ciena, a digital fiber optics company. I liked the holes and the daylight that streamed through.
But the blinds were light grey, and thus no contrast for the light holes if my main light hit the blinds. So I restricted it with a snoot. (You can read more about creating that particular shot here, where there's an example shot without the snoot, too.)
One disadvantage to a snoot is that the fall-off area of the light's beam is not very elegant. It's kinda of abrupt. If you want a more elegant, gradient fall-off to the light beam, you'll want to use a grid spot instead of a snoot. Here's an example:
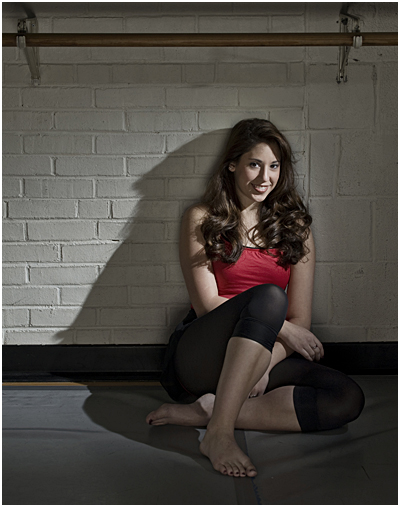
Remember our dancer shot from a few posts ago? The umbrella was on the ground, acting like a fill (or secondary) light. The key (or "primary") light was a flash with a grid spot. In this case it was a Honl Speed Grid (in the 1/8" size).
Grids are a little more expensive than snoots, and generally not worth DIY'ing. But they give beautiful gradients at the edges of the light.
You can see how the edges of the key light gradate very nicely above.
__________
So, restricted light. The takeaway from this page is that now we can have more precise light that we can sculpt. You know that cool shaft of light you like to exploit when you see it coming from a window or something? Now you can make it any time.
This is a very useful style of light for cool portraits, but you have to be aware of your ambient level. Crank up the shutter speed for more drama, or open it up for more detail in the unlit areas. The choice—and control—is yours.
For many beginners, this is a new technique that will open up loads of possibilities. Spend an evening experimenting with it at home to start to understand what it can do.
Next: Textural Lighting for Detail Shots

Now that you are getting comfortable with the idea of shooting a light into an umbrella or ceiling, creating the lighting ratio and being color correct, it's time to start stretching a little.
Sometimes what makes a photo sing is not so much where the light is, but where it isn't. And, given that you already have a basic, off-camera strobe setup, you can make the gear you will need to restrict light for just a few pennies.
Remember when we talked about putting the Velcro on the sides of your flash head? It holds gels fine, but you can also use it to attach lighting mods to your flash. (You don't have to permanently attach Velcro to your flash, either. There are removable Velcro "grippers" for mounting things.)
One of my favorites is called a "gobo." Gobo is short for "goes between optics," as in something that goes between the light and your lens. Some people also call them cutters, or flags. Whatever you call them, they are there to partially block light.
 To make a useful-sized GoBo, Cut a piece of still cardboard to make a rectangle about 4x8 inches. Stick some Velcro (the "hooks" side) at one end and at about a third of the way from the other end. This will allow you to attach it to the side of your flash either way so that you can choose how far it sticks out.
I also cover mine with a layer of gaffer's tape. This is the cloth-backed tape that is widely used in the photo industry. It holds great and does not leave any residue. It is not duct tape. Not even close. They are not interchangeable.
Now, you have a sort of "barn door" (really, that's what it's called) that can block the light from your flash in the direction that you choose.
Say you are using your flash to side/backlight something. Your flash, being small and not-too-powerful, is just out of the camera frame. The Gobo could be stuck on the side of the strobe closest to you to keep light from flaring into your lens.
You can also use one on each side of the flash to make light that spreads vertically, but not horizontally (or vice versa.) You can keep light off of a background this way, as you may be lighting it from another source.
You can make them out of cardboard or you are into the DIY look. They just slide into the lid or back pocket of a Domke bag and weigh almost nothing. No brainer.
 If you want to restrict the light even more, you'll want a snoot. It is nothing more than a sort of tunnel for the light to go through that will restrict it is all directions except for the exact direction the strobe is pointed.
 Just shape the cardboard into a rectangular-shaped tube that will slide over your flash head. Make a few - 6", 8", 12" - the longer the tube, the tighter the beam of light. Now cover it in gaffer's tape to make it more durable and light-tight.
(By the way, when you shoot with a snoot, set your flash on its most telephoto setting. No sense in wasting power by sending a wide beam of light just to block it with the snoot.)
How much do snoots restrict the light? Let's do a test:

This is a flash fired against the wall (4 feet away) at the "85mm" zoom setting. Note the pattern of the light.
This is the same setup, with an 5" snoot on the flash.
When doing a portrait, the aim of the snooted flash is obviously a bit critical. How can you tell where the beam will hit without a modeling lamp on your flash?
Easy. You ask your subject, "Can you see the front of my flash through the tube from where you are sitting?" If they can, the light will be falling on their face. Do a test and tweak it as necessary using the back of your camera's display as a guide.
__________
In the frame at the top of this page, I used a snoot to light the face of the CEO of Ciena, a digital fiber optics company. I liked the holes and the daylight that streamed through.
But the blinds were light grey, and thus no contrast for the light holes if my main light hit the blinds. So I restricted it with a snoot. (You can read more about creating that particular shot here, where there's an example shot without the snoot, too.)
One disadvantage to a snoot is that the fall-off area of the light's beam is not very elegant. It's kinda of abrupt. If you want a more elegant, gradient fall-off to the light beam, you'll want to use a grid spot instead of a snoot. Here's an example:
Remember our dancer shot from a few posts ago? The umbrella was on the ground, acting like a fill (or secondary) light. The key (or "primary") light was a flash with a grid spot. In this case it was a Honl Speed Grid (in the 1/8" size).
Grids are a little more expensive than snoots, and generally not worth DIY'ing. But they give beautiful gradients at the edges of the light.
You can see how the edges of the key light gradate very nicely above.
__________
So, restricted light. The takeaway from this page is that now we can have more precise light that we can sculpt. You know that cool shaft of light you like to exploit when you see it coming from a window or something? Now you can make it any time.
This is a very useful style of light for cool portraits, but you have to be aware of your ambient level. Crank up the shutter speed for more drama, or open it up for more detail in the unlit areas. The choice—and control—is yours.
For many beginners, this is a new technique that will open up loads of possibilities. Spend an evening experimenting with it at home to start to understand what it can do.
Next: Textural Lighting for Detail Shots
__________
New to Strobist? Start here | Or jump right to Lighting 101
Got a question? Hit me on Twitter: @Strobist
Have a passport? Join me in Hanoi: X-Peditions Location Workshops
Permalink

<< Home